By Ethan Brooks
Updated November 2026
Off grid solar system information comes down to one core idea: a standalone system generates, stores and delivers its own electricity without a utility connection. This guide explains the parts involved, walks through how to size each one, and shows the wiring logic you need before buying anything. By the end, you should be able to estimate your daily energy use and outline a working system on paper.
What an Off-Grid Solar System Actually Does
An off-grid system must cover every hour of the day, including nights and cloudy stretches, using only what it generates and stores. That makes it different from a grid-tied setup, which exports surplus to the utility. If you want a plain-language definition before going further, see What Is Meant by Off Grid Solar System? A Plain-English Answer.
Shopping for one? See our guide: 6 Best DIY Solar Power System Kit Options for Off-Grid Homes (2026).
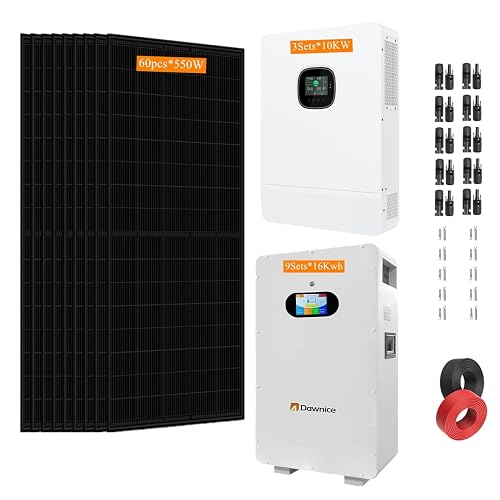
Most DIY off-grid systems share the same basic chain: solar panels feed a charge controller, the controller charges a battery bank, and an inverter converts battery power to 120 V AC for household loads. Some builds also include a DC-only branch for lights, fans or water pumps that skip the inverter entirely to save conversion losses.
Step 1: Calculate Your Daily Energy Use
Every sizing decision starts with your load. List each device, its wattage, and how many hours it runs per day. Multiply to get watt-hours (Wh), then total them.
- Find the wattage on the label or in the manual. If only amps are listed, multiply amps by the voltage (for example, 1.5 A × 120 V = 180 W).
- Estimate daily run time honestly. A refrigerator cycles, so its average draw is often well below its peak rating; a meter or a manufacturer energy figure gives better numbers.
- Multiply watts by hours to get Wh per day for each item.
- Add everything together. Add 20 to 30 percent for inverter and wiring losses.
For example, a LED lighting circuit of 60 W for 5 hours gives 300 Wh. A 150 W laptop charger running 3 hours adds 450 Wh. A small 60 W compressor refrigerator averaging 35 percent duty cycle over 24 hours adds about 504 Wh. Those three together total roughly 1,254 Wh, which with 25 percent loss margin becomes about 1,570 Wh per day. For tools to model this more quickly, the Off-Grid Solar Power System Calculator: How to Size Your Setup Step-by-Step article walks through the same arithmetic.
Step 2: Size the Solar Array
Divide your daily energy need by the peak sun hours at your location. Peak sun hours are the equivalent hours per day at 1,000 W per square meter; the figure varies by season and region, so use the lowest winter value you can find for a dependable system. Then add a derating factor of roughly 0.75 for temperature, dust, wiring and controller losses.
Using the earlier 1,570 Wh per day and assuming 4 peak sun hours:
- 1,570 Wh ÷ 4 hours = 393 W of panels before derating
- 393 W ÷ 0.75 = about 524 W of panels
- Round up to a practical total, such as two 300 W panels (600 W)
Step 3: Size the Battery Bank
Batteries provide autonomy: how many days you can run without sun. Most DIY builders target one to three days. The formula is:
Battery capacity (Wh) = daily load × days of autonomy ÷ depth of discharge
With 1,570 Wh per day, two days of autonomy, and a lithium iron phosphate (LiFePO4) depth of discharge around 0.8 (lead-acid is usually 0.5), you get about 3,925 Wh of usable capacity. Lithium needs about 4,000 Wh nominal storage here, while lead-acid would need roughly 6,300 Wh. Convert watt-hours to amp-hours by dividing by system voltage. A 12 V battery bank of 4,000 Wh needs about 333 Ah.
Step 4: Choose the Inverter and Charge Controller
The inverter must handle your peak simultaneous load, not just the average. Add the wattage of everything you might run at once, then choose a continuous rating about 25 percent above that figure. Surge ratings matter for motors and compressors, since starting current can be several times the running wattage.
The charge controller must handle the array’s short-circuit current and the battery voltage. For MPPT controllers, check that the open-circuit voltage of your panel string, adjusted for cold temperature, stays under the controller’s maximum input rating. Mismatched string voltage is one of the most common causes of controller failure.
Step 5: Plan the Wiring Layout
Wire the system in this order: panels to controller, controller to battery, battery to inverter, and inverter to loads. Keep the battery-to-inverter run short and use cable sized for the current, because low-voltage DC currents get large quickly. Install a fuse or breaker at the battery terminal and another at the panel input. Ground the metal frames and follow your local electrical code, which may require a licensed electrician for final connections or permits.
| Component | Key sizing input | Typical check |
|---|---|---|
| Solar array | Daily Wh ÷ peak sun hours | Derate by about 0.75 |
| Battery bank | Daily Wh × autonomy days | Divide by depth of discharge |
| Charge controller | Array current and voltage | Input voltage limit |
| Inverter | Peak simultaneous load | Add about 25% margin |
Checklist: Tools and Supplies You Will Need
- Multimeter for checking voltage, current and continuity
- Wire stripper, crimper and ring or spade terminals sized to your cable
- Appropriately rated DC fuses or breakers
- Torque driver or wrench to manufacturer specifications
- Mounting hardware and roof or ground rack
- Battery monitor or shunt to track state of charge
Common Mistakes
- Sizing only for average load and ignoring peak surges from pumps and motors.
- Underestimating winter sun. Size for the worst month you will actually use.
- Using undersized cable on long DC runs, which causes voltage drop and heat.
- Exceeding the controller’s maximum open-circuit voltage in cold weather.
- Skipping fusing, which leaves batteries and wiring unprotected against shorts.
- Mixing battery chemistries or old and new batteries in one bank.
Tips for a Reliable Build
- Start with a modest system and expand once you have measured real consumption for a few weeks.
- Install a battery monitor so you can see state of charge and daily harvest.
- Keep a written wiring diagram with fuse ratings and cable gauges for future troubleshooting.
- For a broader comparison of kit and package options, see Top 7 DIY Off Grid Solar System Kits Compared for Homes (2026).
Recommended gear
A battery monitor with a shunt is one of the most useful additions, since it tracks state of charge and actual energy in and out. Look for a model that reports amp-hours and voltage in real time.
A quality MPPT charge controller matches the panel array voltage to the battery, which can recover meaningful energy in cooler weather or when panels run above battery voltage. View on Amazon
A pure sine wave inverter is the safer choice for sensitive electronics, motors and compressors, since it produces clean household-grade AC. View on Amazon
A clamp-style DC meter helps verify current in each branch during commissioning and troubleshooting. View on Amazon
FAQ
How much solar do I need for a basic off-grid home?
It depends on daily consumption and sun hours. A modest home using about 5 kWh per day in a region with 4 peak sun hours typically needs roughly 1.5 to 2 kW of panels after derating, plus battery storage sized for your autonomy target.
What is the difference between off-grid and grid-tied?
Off-grid systems have no utility connection and rely entirely on batteries for nighttime and cloudy-day power. Grid-tied systems export surplus to the utility and draw from the grid when needed.
Do off-grid systems need a backup generator?
Many builders include one for extended cloudy periods or heavy seasonal loads. It is a practical safety net, though the right answer depends on your location and how much autonomy you design in.
Which battery type is better for DIY off-grid use?
LiFePO4 offers higher usable depth of discharge and longer cycle life than lead-acid, while lead-acid is lower in initial complexity. Both can work, but sizing math changes with the chemistry.
Can I run a refrigerator on a small off-grid system?
Yes, a compressor refrigerator is a common off-grid load, but its surge current and daily energy use must be included in your sizing. Check the manufacturer’s energy consumption figure.
Do I need a permit to install an off-grid system?
Requirements vary by jurisdiction. Many areas require permits and inspections for electrical work, so check with local authorities and consult a licensed electrician for final connections and safety verification.
How long do off-grid batteries last?
Lifespan depends on chemistry, depth of discharge, temperature and charging practices. Manufacturers publish cycle ratings, but actual life varies with how the system is operated.
Conclusion
Good off grid solar system information starts with an accurate load estimate and works outward to panels, batteries, controller and inverter. Size each component with its derating and margin, then verify the wiring and protection before energizing. Consult a licensed electrician for any work involving your main panel or local code requirements.
Related reading
- Wind Solar Hybrid Off Grid System: How to Size and Wire One
- V Guard Off Grid Solar System: Sizing, Parts and Wiring Guide (2026)
Ready to choose one?
About Ethan Brooks
Ethan Brooks is part of our editorial team and reviews and edits our DIY solar power systems guides, checking product details against manufacturer specifications and owner feedback.